Demonstrates how you can use Make to automate your Trello content calendar to publish content created in Google Docs to your Contentful website.

A content calendar helps you organise your content marketing efforts by keeping track of your content marketing campaigns and the various pieces of content related to each campaign across your different social media channels.
It allows you to plan upcoming content, create tasks related to the various pieces of content, and assign those tasks to your team members and other stakeholders. Trello is a popular choice for creating a content calendar. We invite you to read the blog post by Trello describing how you can create your perfect editorial calendar with Trello.
In this blog post, we’ll demonstrate creating a content calendar for blog posts using Trello and then automate publishing blog post content from Google Docs to your Contentful website using Make (previously called Integromat) and Cloudpress.
Before we get started, let’s take a high-level view of the proposed solution. The idea is to have the following workflow.
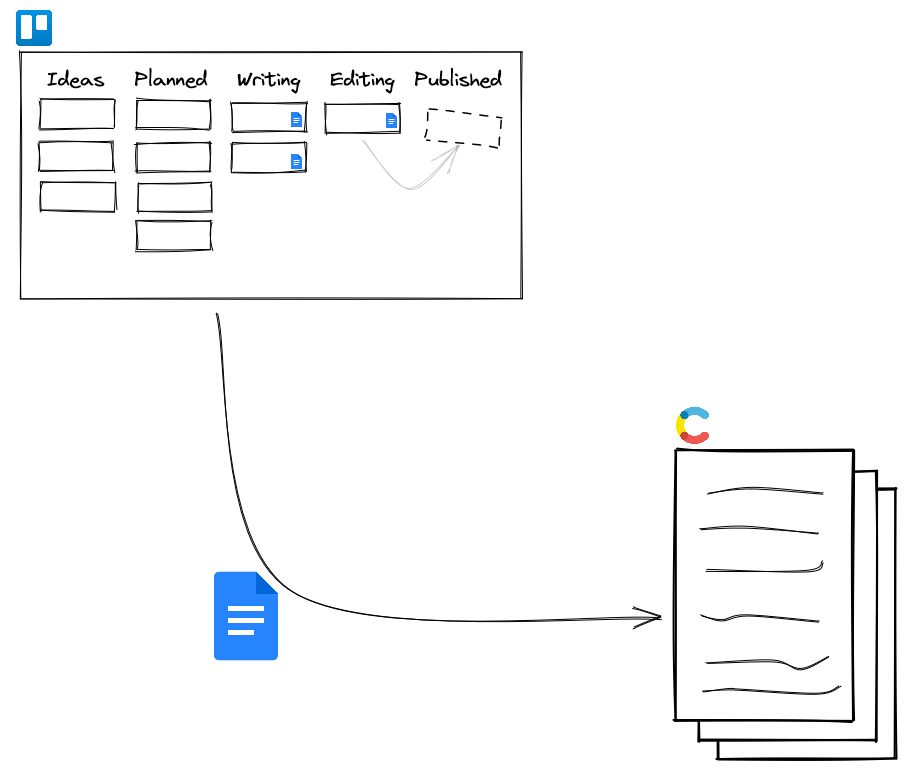
To implement this workflow, we’ll need to make use of a variety of different applications as follows:
Cloudpress is used to export content from Google Docs to Contentful. Cloudpress converts the content from the Google Docs format into markdown. It preserves all formatting, such as bold text, italic text, and headings. It also exports the images in the Google Doc as assets to Contentful and ensures they are linked correctly in the exported markdown.
Cloudpress offers other befits we won’t cover in this guide. For more details, we suggest you refer to our Contentful integration page.
Configuring Cloudpress consist of the following steps:
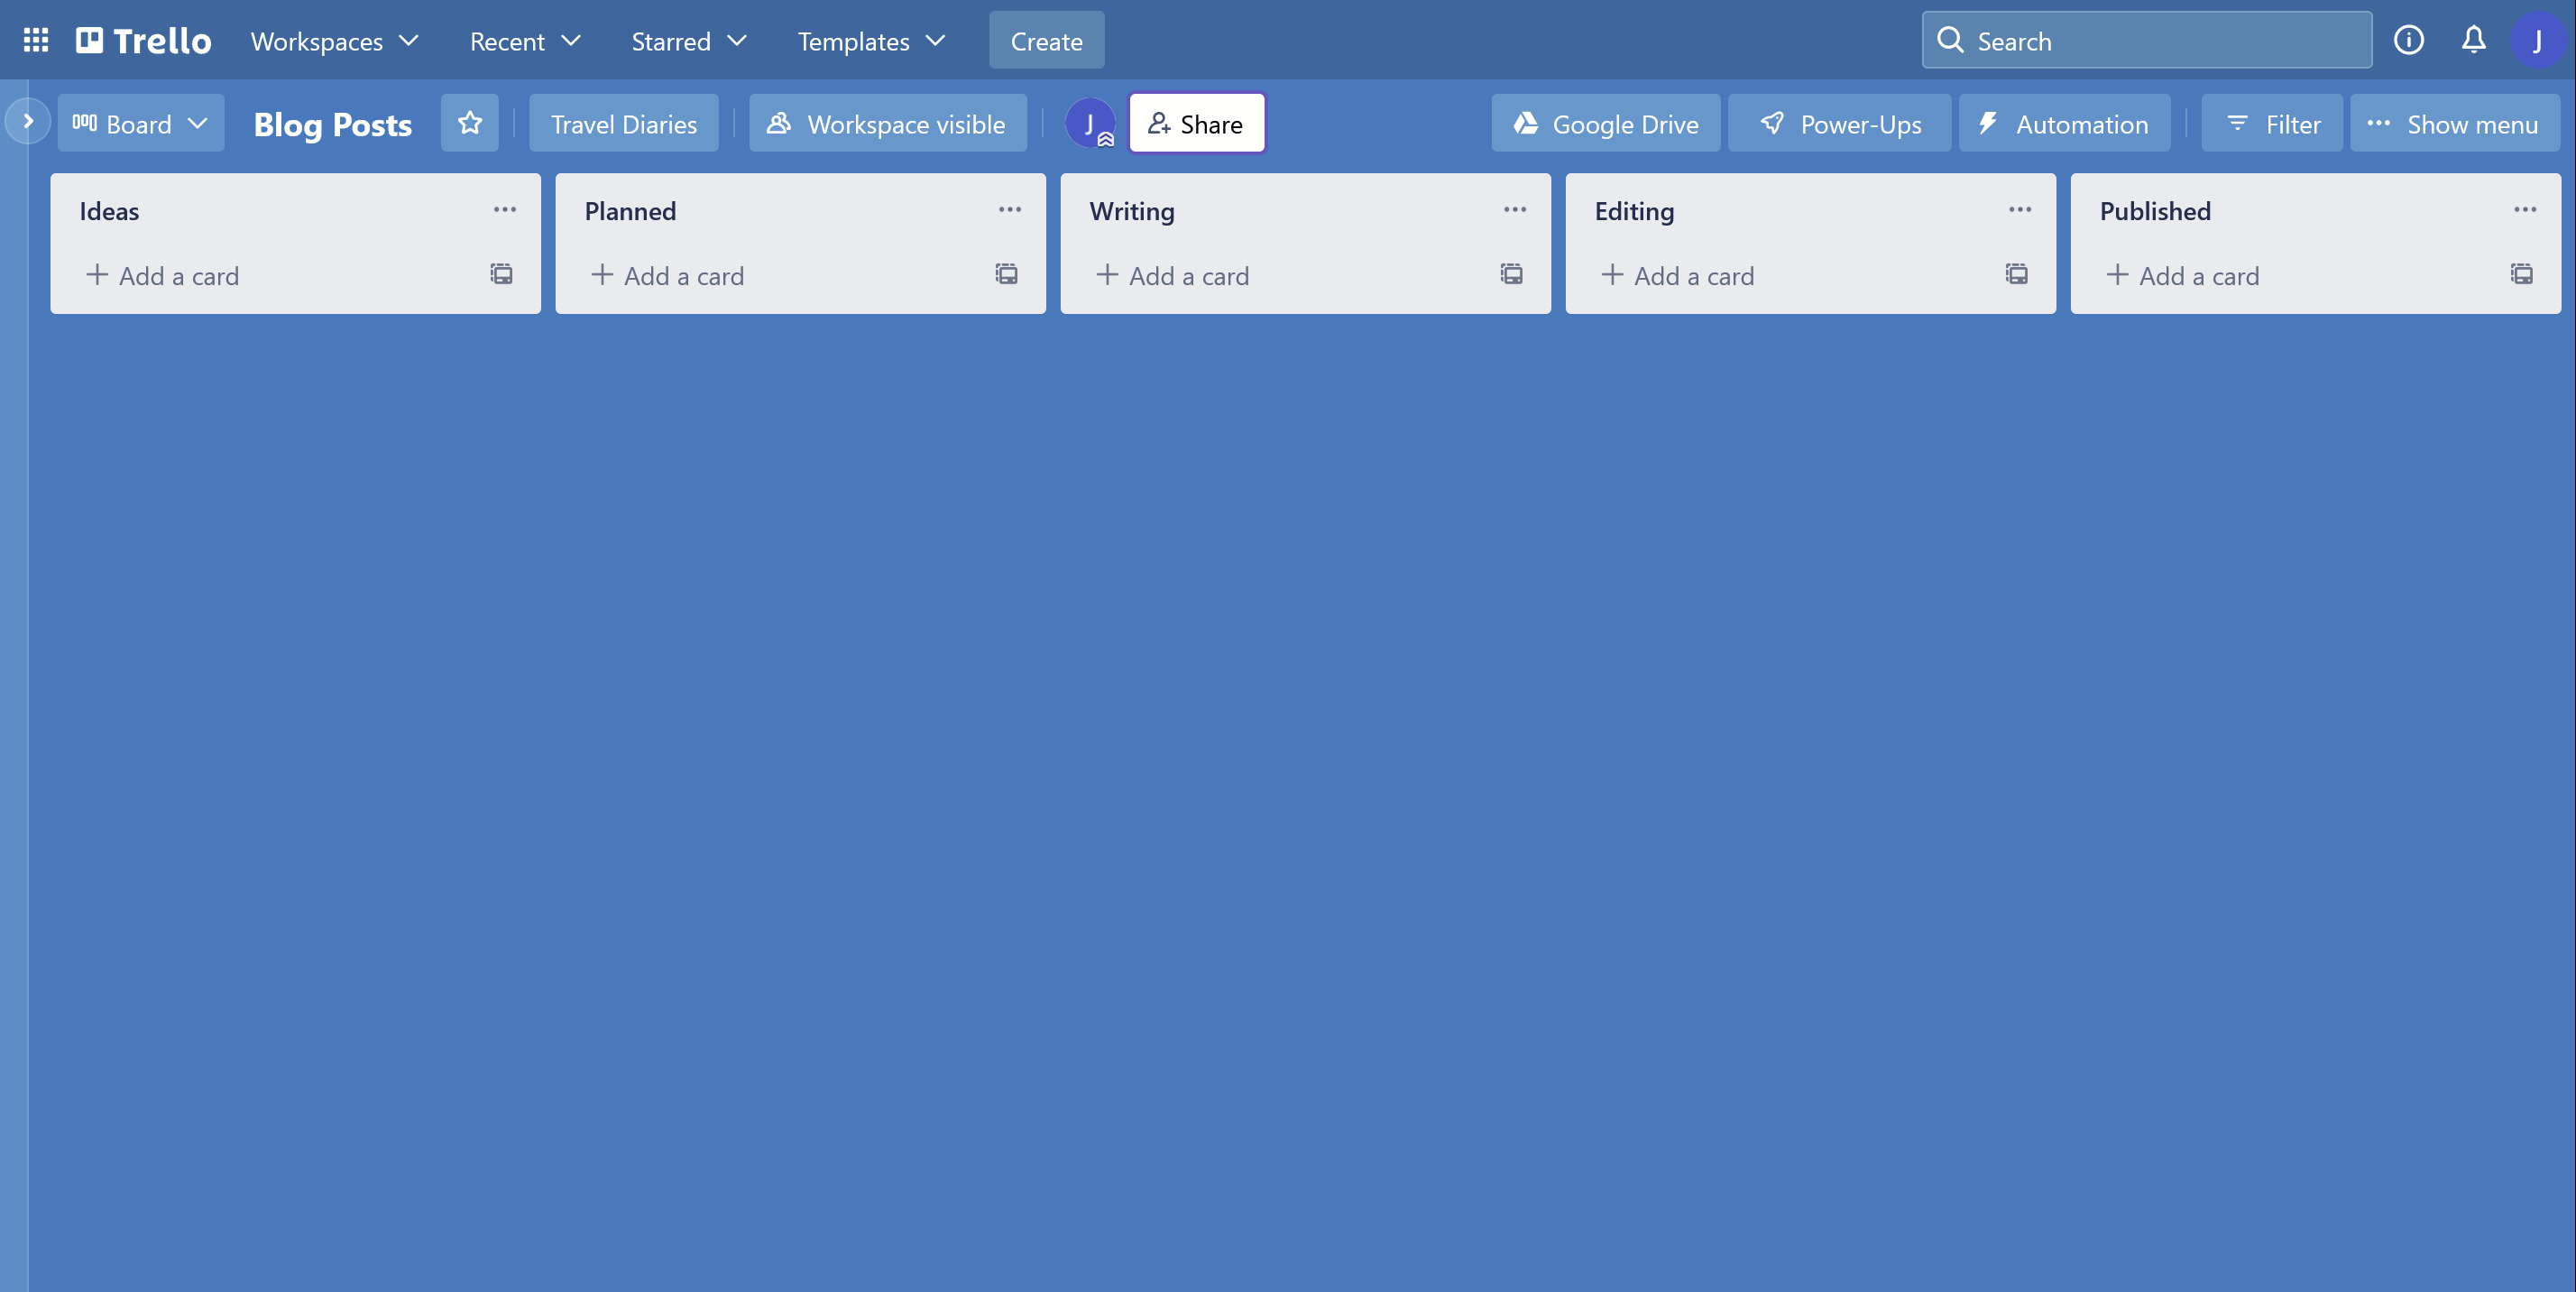
We use Trello as a Kanban board to plan and track the progress of the blog content. In a real-life scenario, you will probably use Trello to track the production of all content - blog posts, social media, videos, etc. - but for this tutorial, we’ll be focusing only on blog content.
You can create the columns of the Trello board to suit your content creation flow. I am using the following columns for mine: Ideas, Planned, Writing, Editing and Published.
 Content items will progress through the various stages until it reaches the Published column. At that point, the workflow we create in Make will pick it up, process it and pass it along to Cloudpress for export to Contentful.
We also need to attach the Google Doc that contains the blog post’s content to each Trello card for the Make workflow to know which content to export. You can see an example of this in the screenshot below:
 The Google Doc is attached by clicking on the Add an attachment button, selecting the Google Drive option, and selecting the relevant document.
 Please refer to the Trello documentation on attaching documents with Google Drive if you require more assistance. Alternatively, you can also use the Google Drive Power-Up for Trello.
Make is an application that allows you to create workflows (called scenarios) that automate tasks between various applications. For this tutorial, we’ll create a scenario that is triggered when a user moves a card on the Trello board to the Published column, indicating that the blog post is ready for publication.
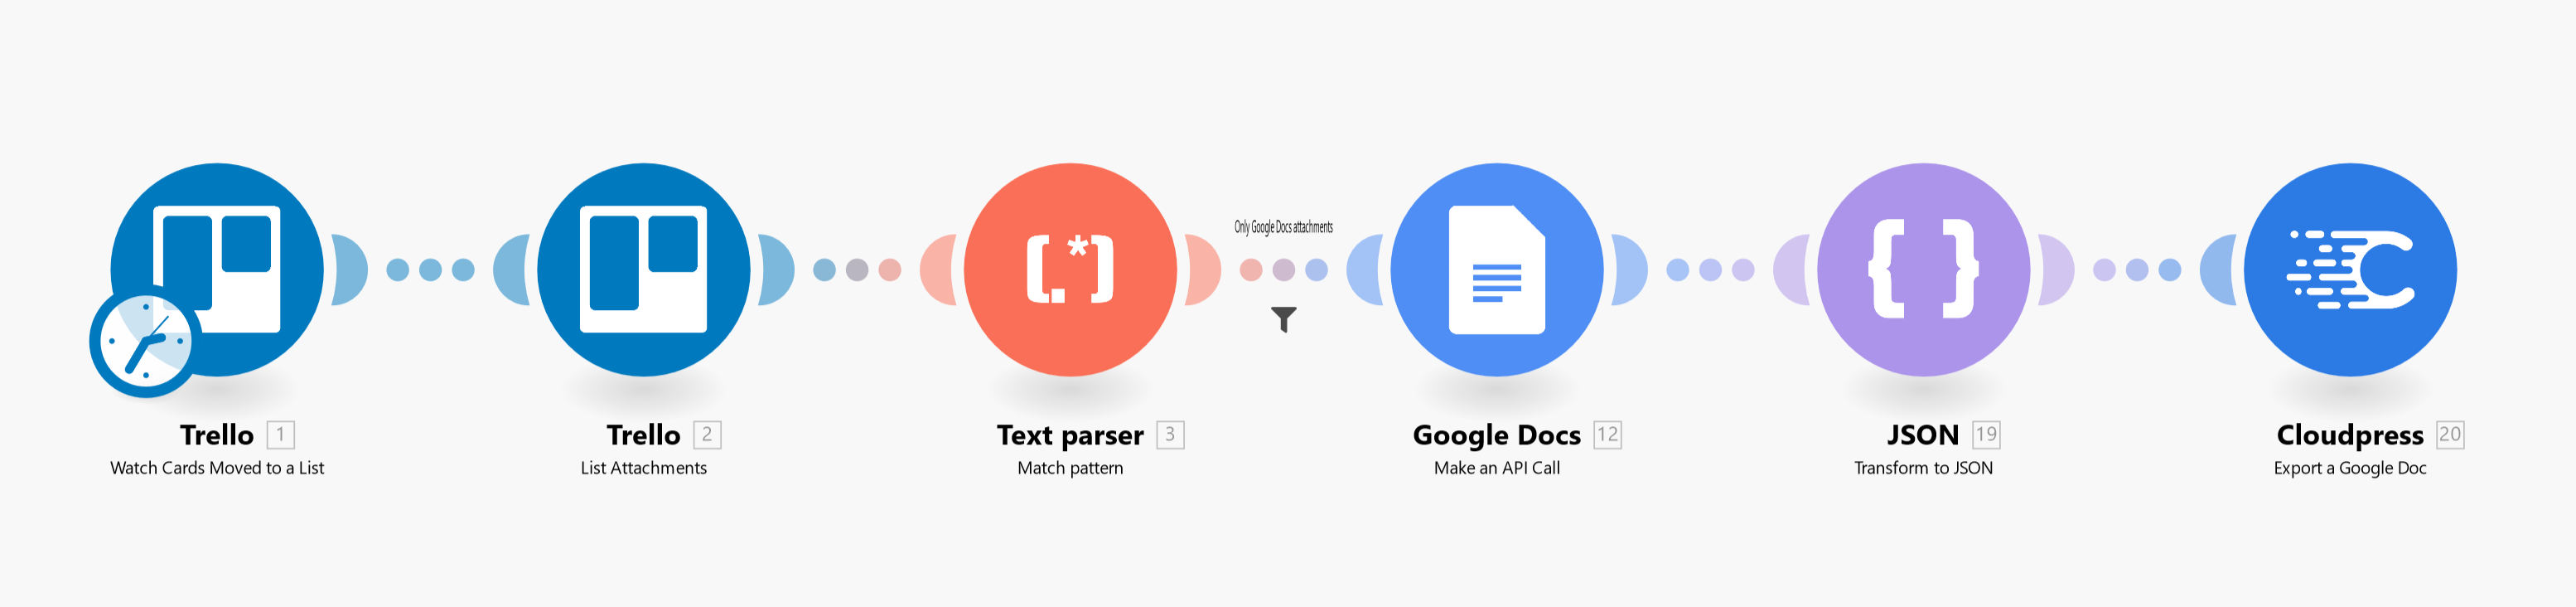
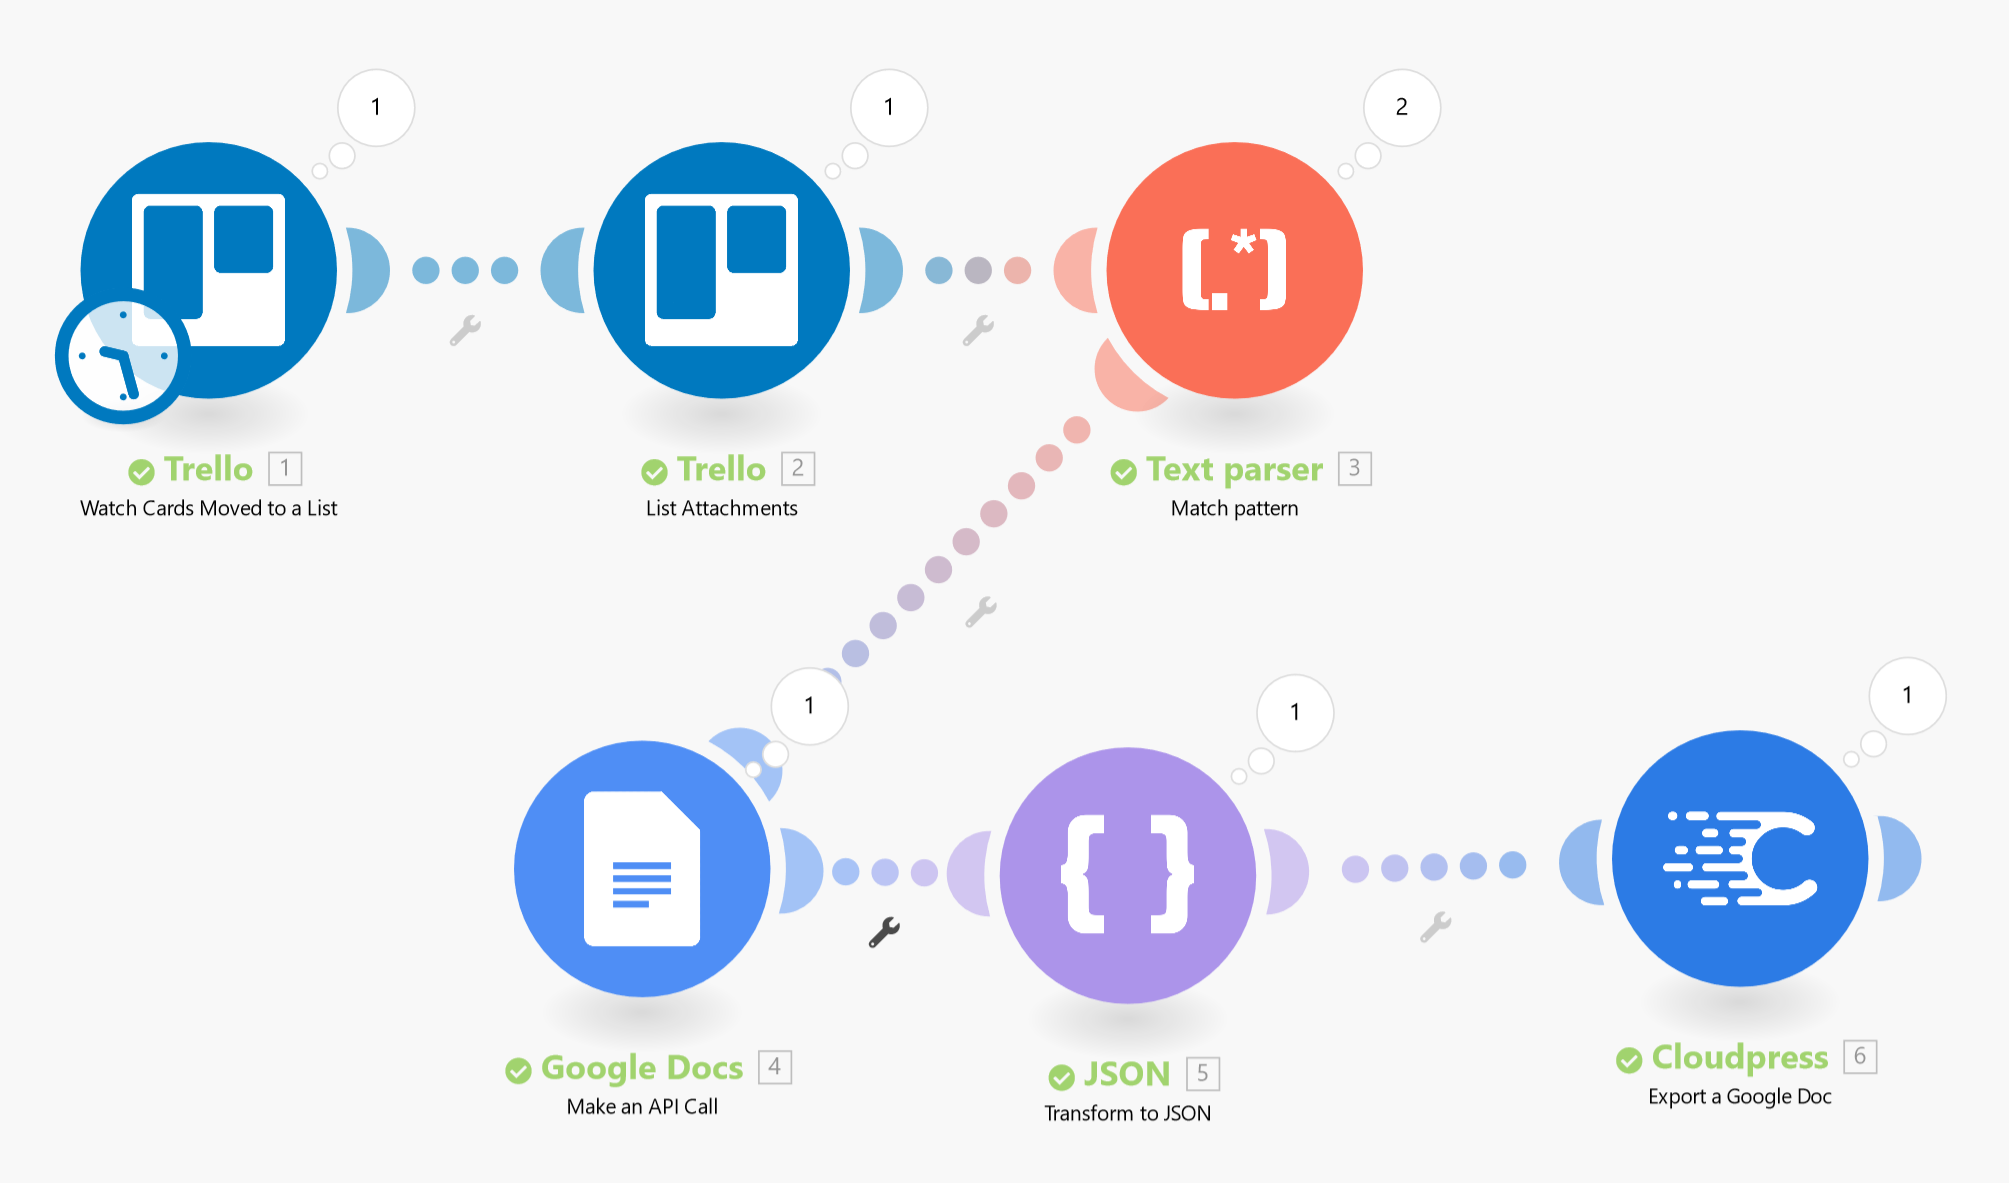
The final scenario we’ll build is depicted in the image below:
 Before we start building, let’s discuss the various items in the scenario and their purpose.
For the remainder of this tutorial, we will assume that you have a Make account and have a basic understanding of Make.
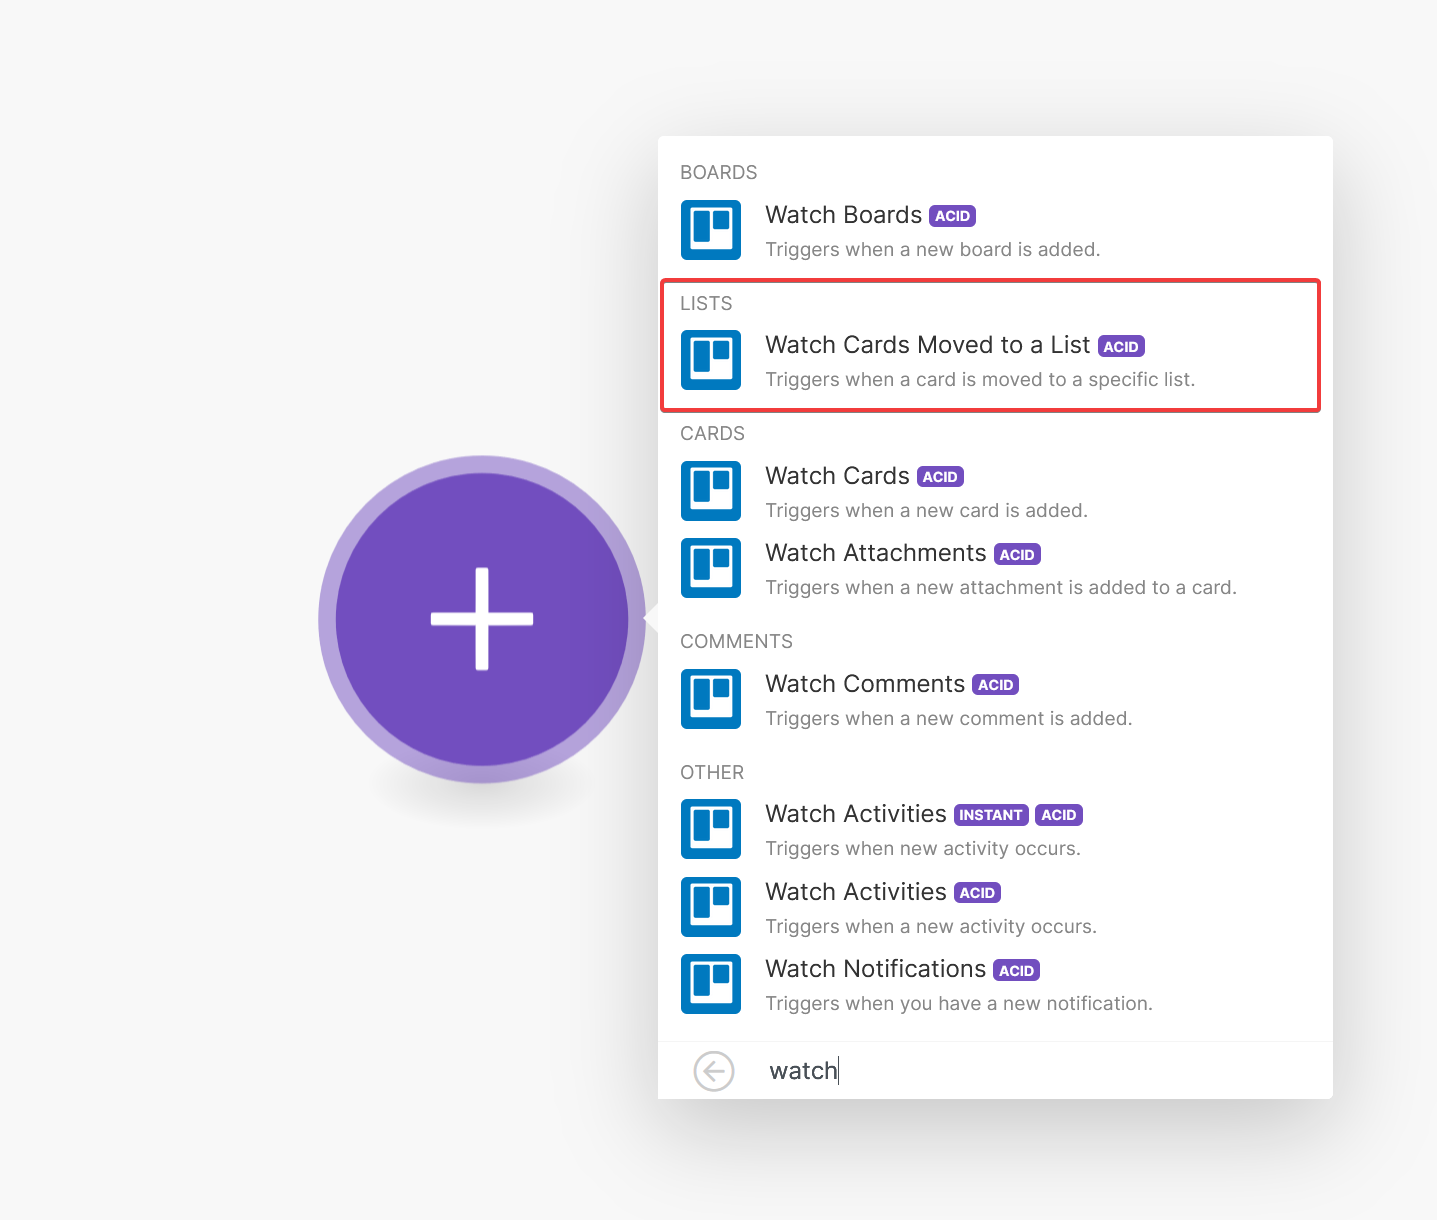
Create a new scenario in Make and select the “Watch Cards Moved to a List” action.
 If this is the first time you use Trello with your Make account, you will need to add a Trello connection. Once you’ve done that, select the Trello board you are using for your content calendar and the list (i.e. the column) on that board where you will move cards once they are ready to be published.
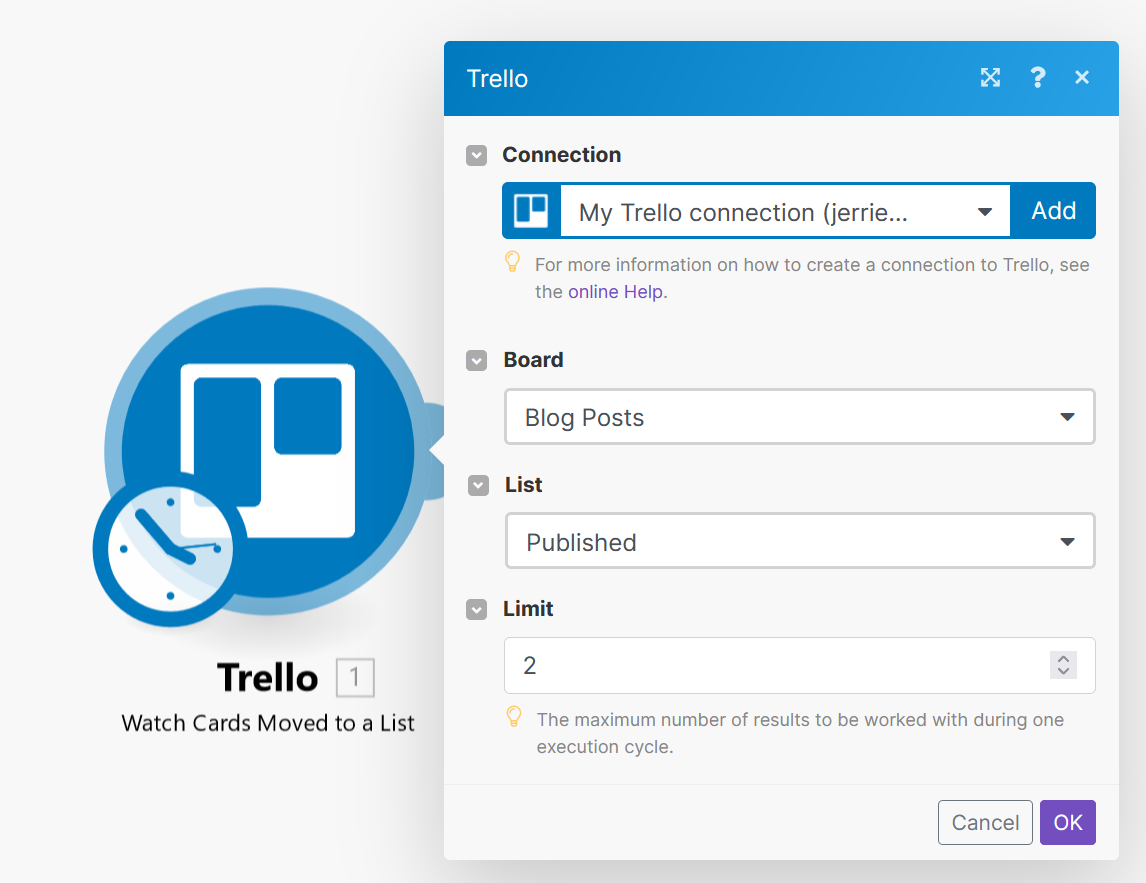 In the example above, I have selected the Blog Posts board and indicated that I want to watch for cards moved to the Published list.
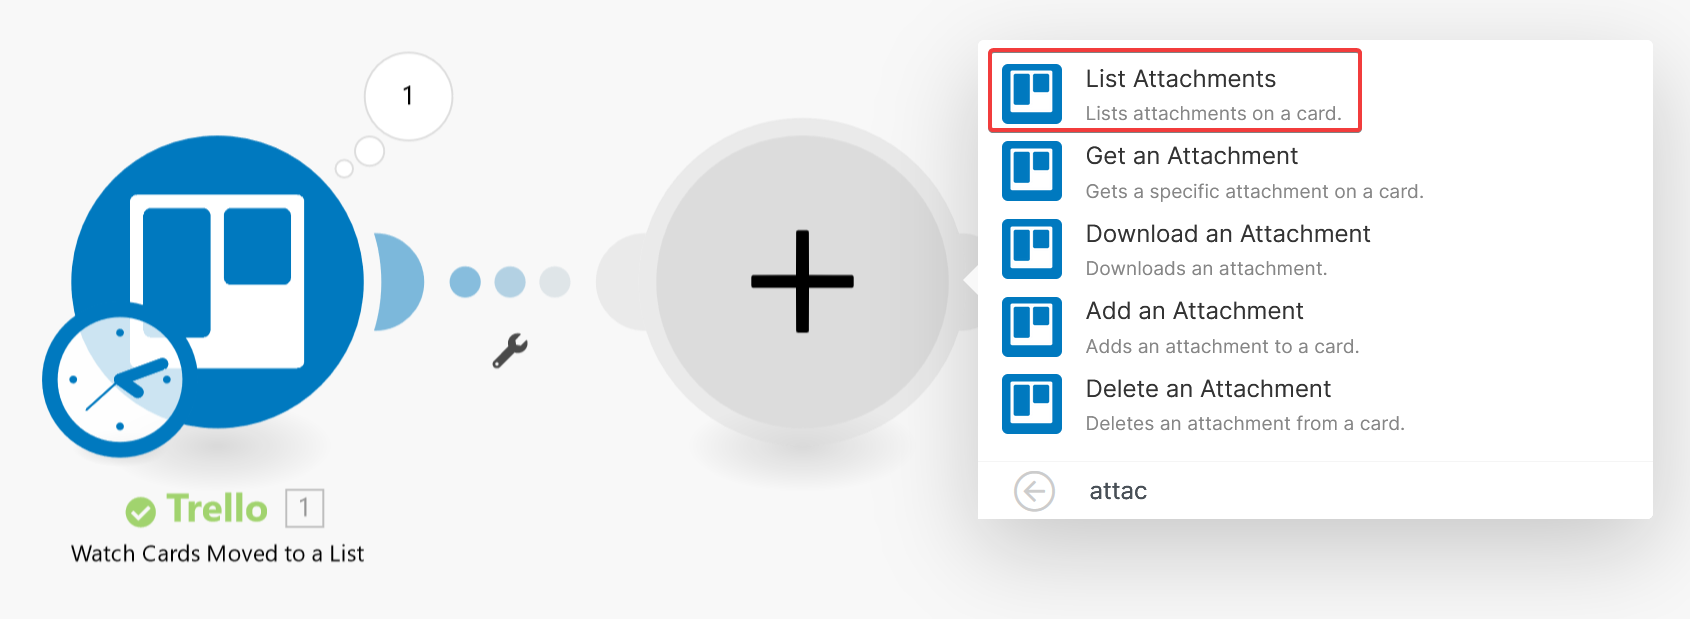
The output from the “Watch Cards Moved to a List” action does not include the attachments for cards, so we need an additional step to retrieve the attachments. Add a new module to the scenario, and select the “List Attachments” action.
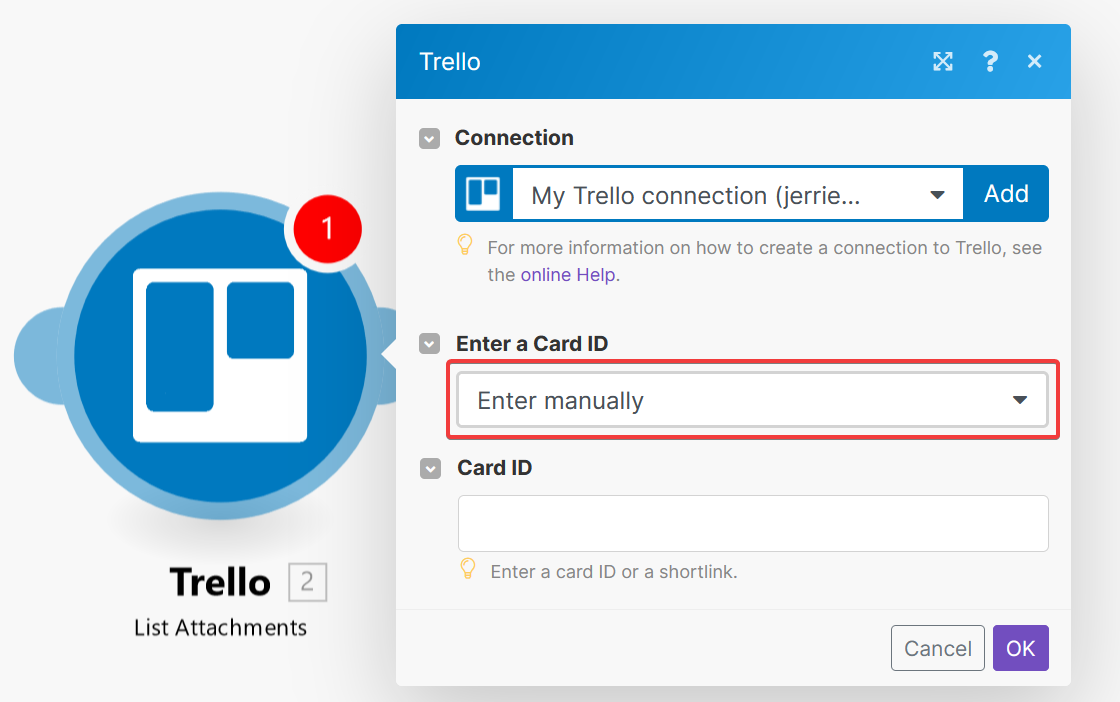
 Select the Trello connection you have already defined, and select Enter manually for the Enter a Card ID field.
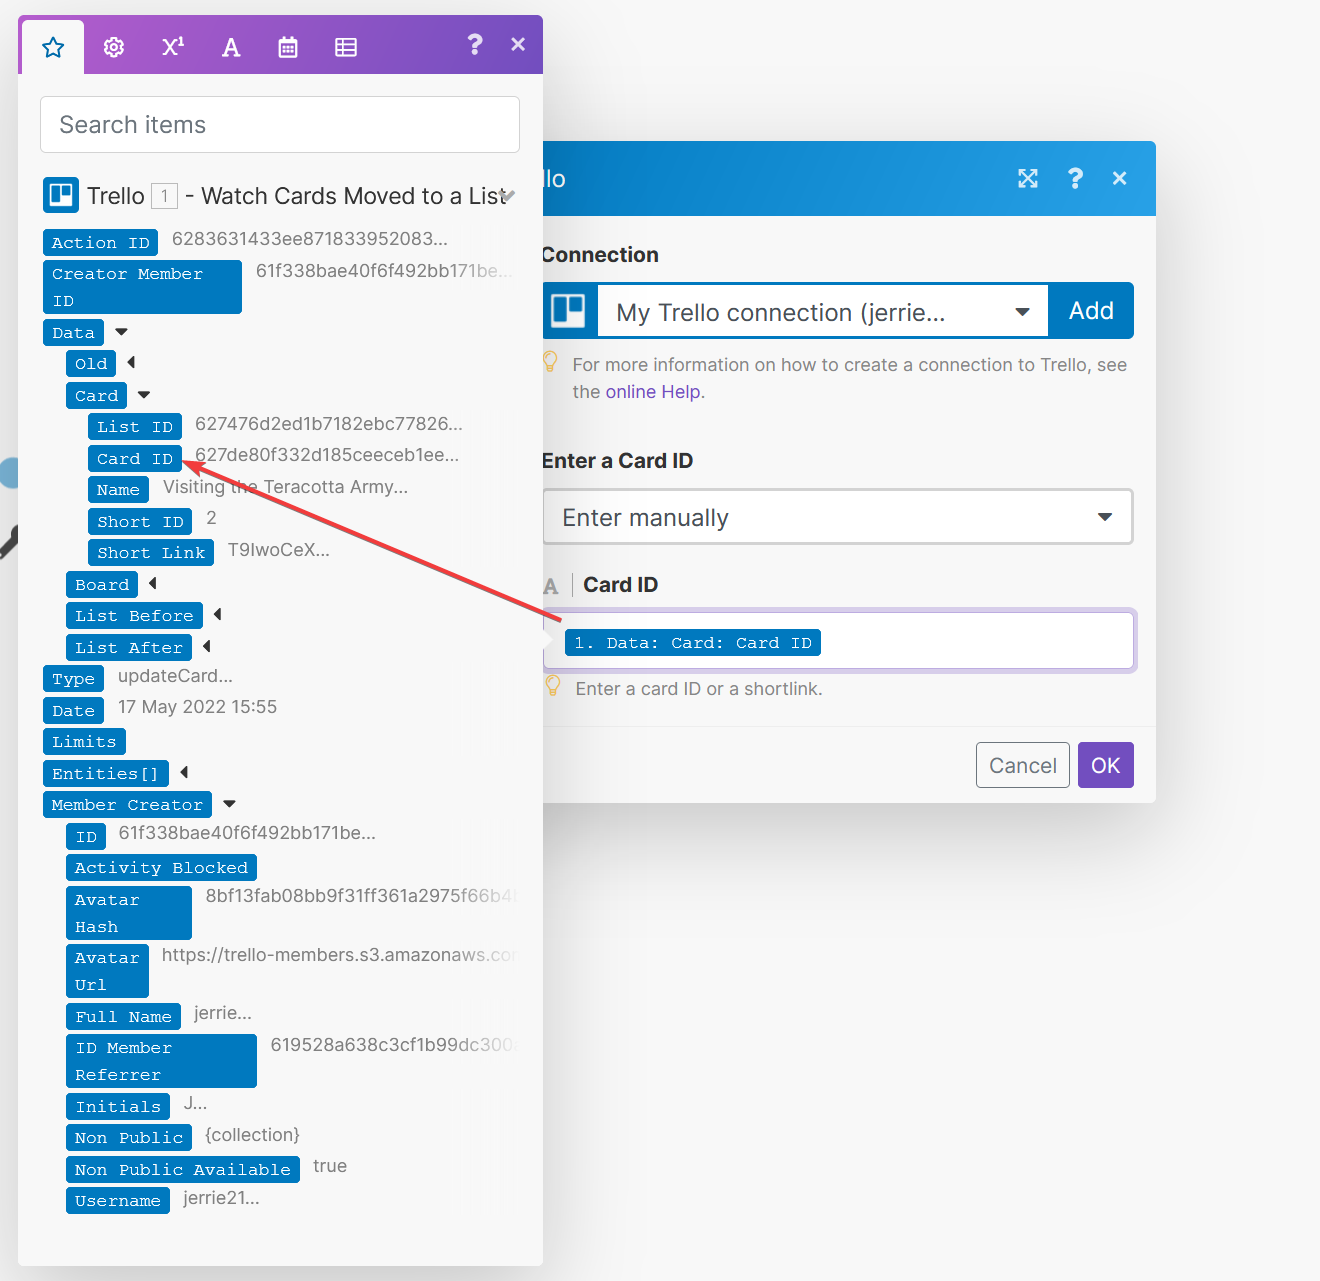
 Open the item picker and select the
 Data > Card > Card ID field from the previous step for the Card ID.
At this point, it would be good to get an idea of the output of the List Attachments action. Make sure you have a Trello card with a Google Doc added as an attachment and that the card has been moved to the Published column. Then, run the scenario and inspect the output.
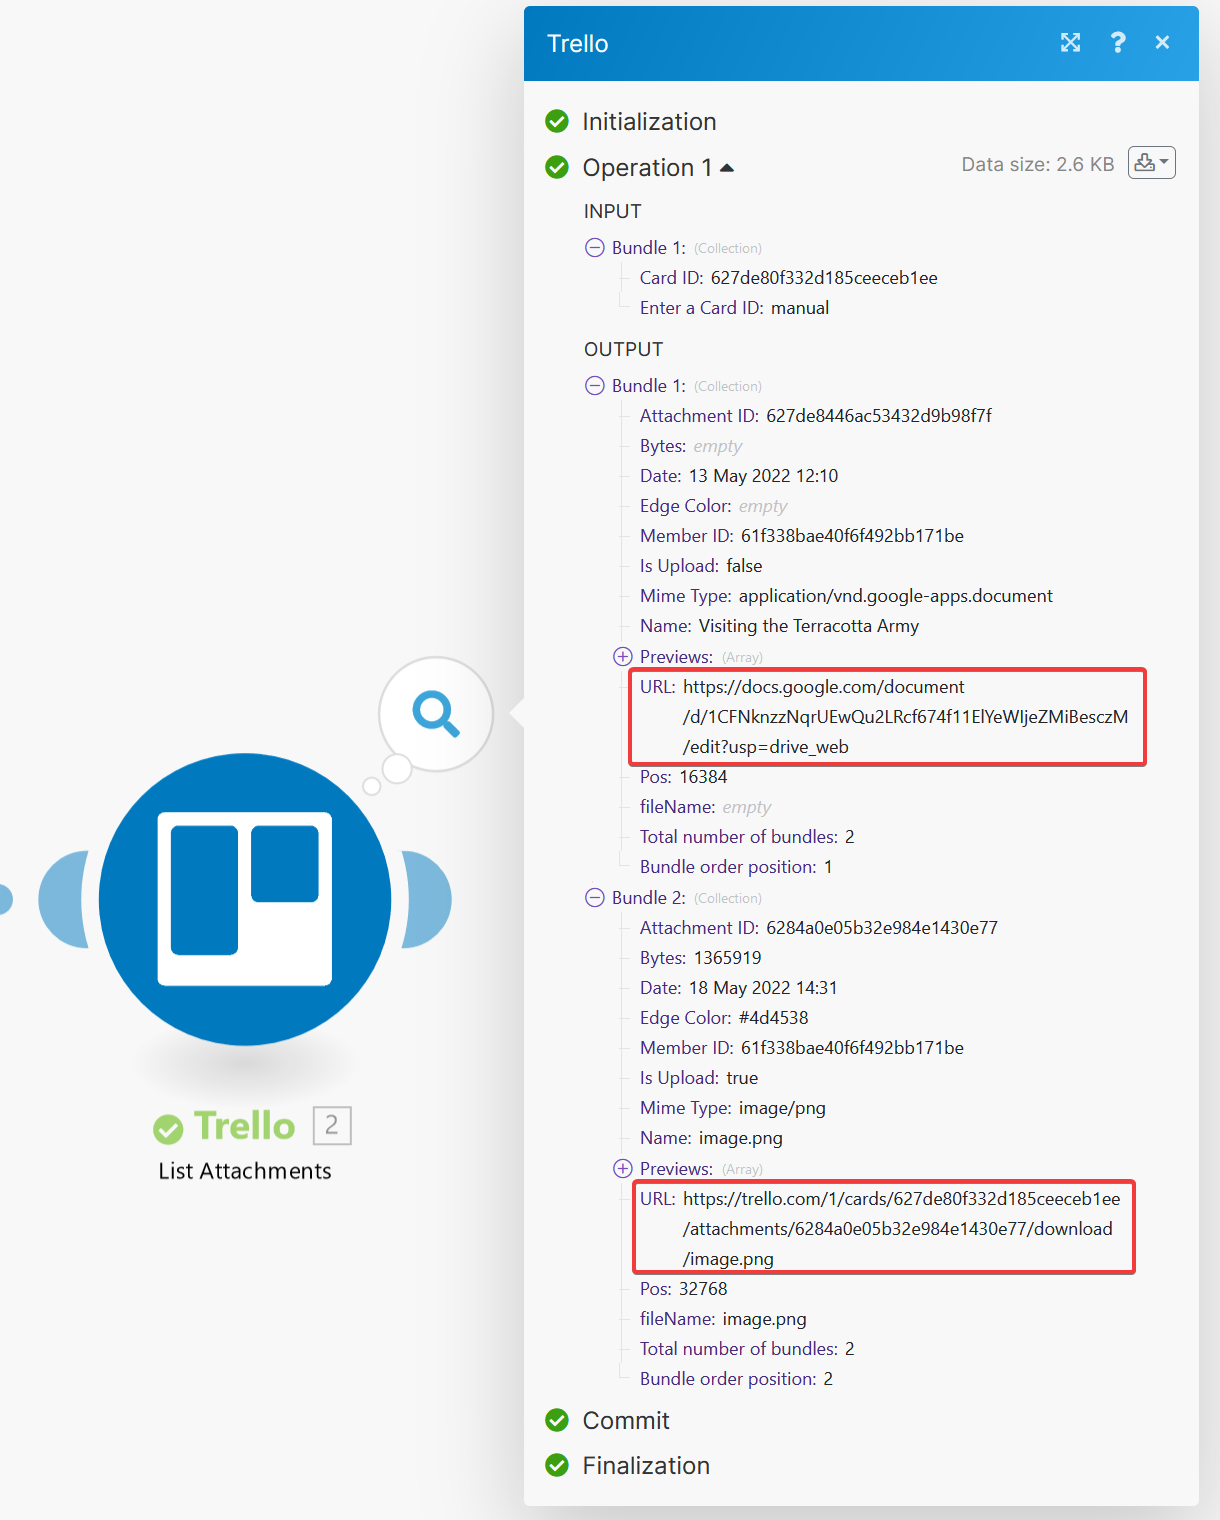 In this example, I have a card with two attachments. One is an image, and the other is a Google Doc. As you can see, we can identify Google Docs in a couple of ways. One way to identify it is by the Mime Type field, which has a value of
 application/vnd.google-apps.document.
The other way we can identify it is by the URL, which, in the example above, has a value of https://docs.google.com/document/d/1CFNknzzNqrUEwQu2LRcf674f11ElYeWIjeZMiBesczM/edit?usp=drive_web. The 1CFNknzzNqrUEwQu2LRcf674f11ElYeWIjeZMiBesczM part of the URL is the document ID used to retrieve the contents of the document from Google. We need a way to extract the document ID from the URL so we can use it.
The best way to do this is by using a regular expression. From the Wikipedia page, you can see that regular expressions are defined as follows:
A regular expression […] is a sequence of characters that specifies a search pattern in text. Usually such patterns are used by string-searching algorithms for “find” or “find and replace” operations on strings, or for input validation.
This tutorial will not detail the mechanics of regular expressions, but they are a handy technique to know, and we recommend that you learn how to use them - at least at a basic level.
Add a new module to your scenario and select the “Match pattern” action from the “Text Parser” module.
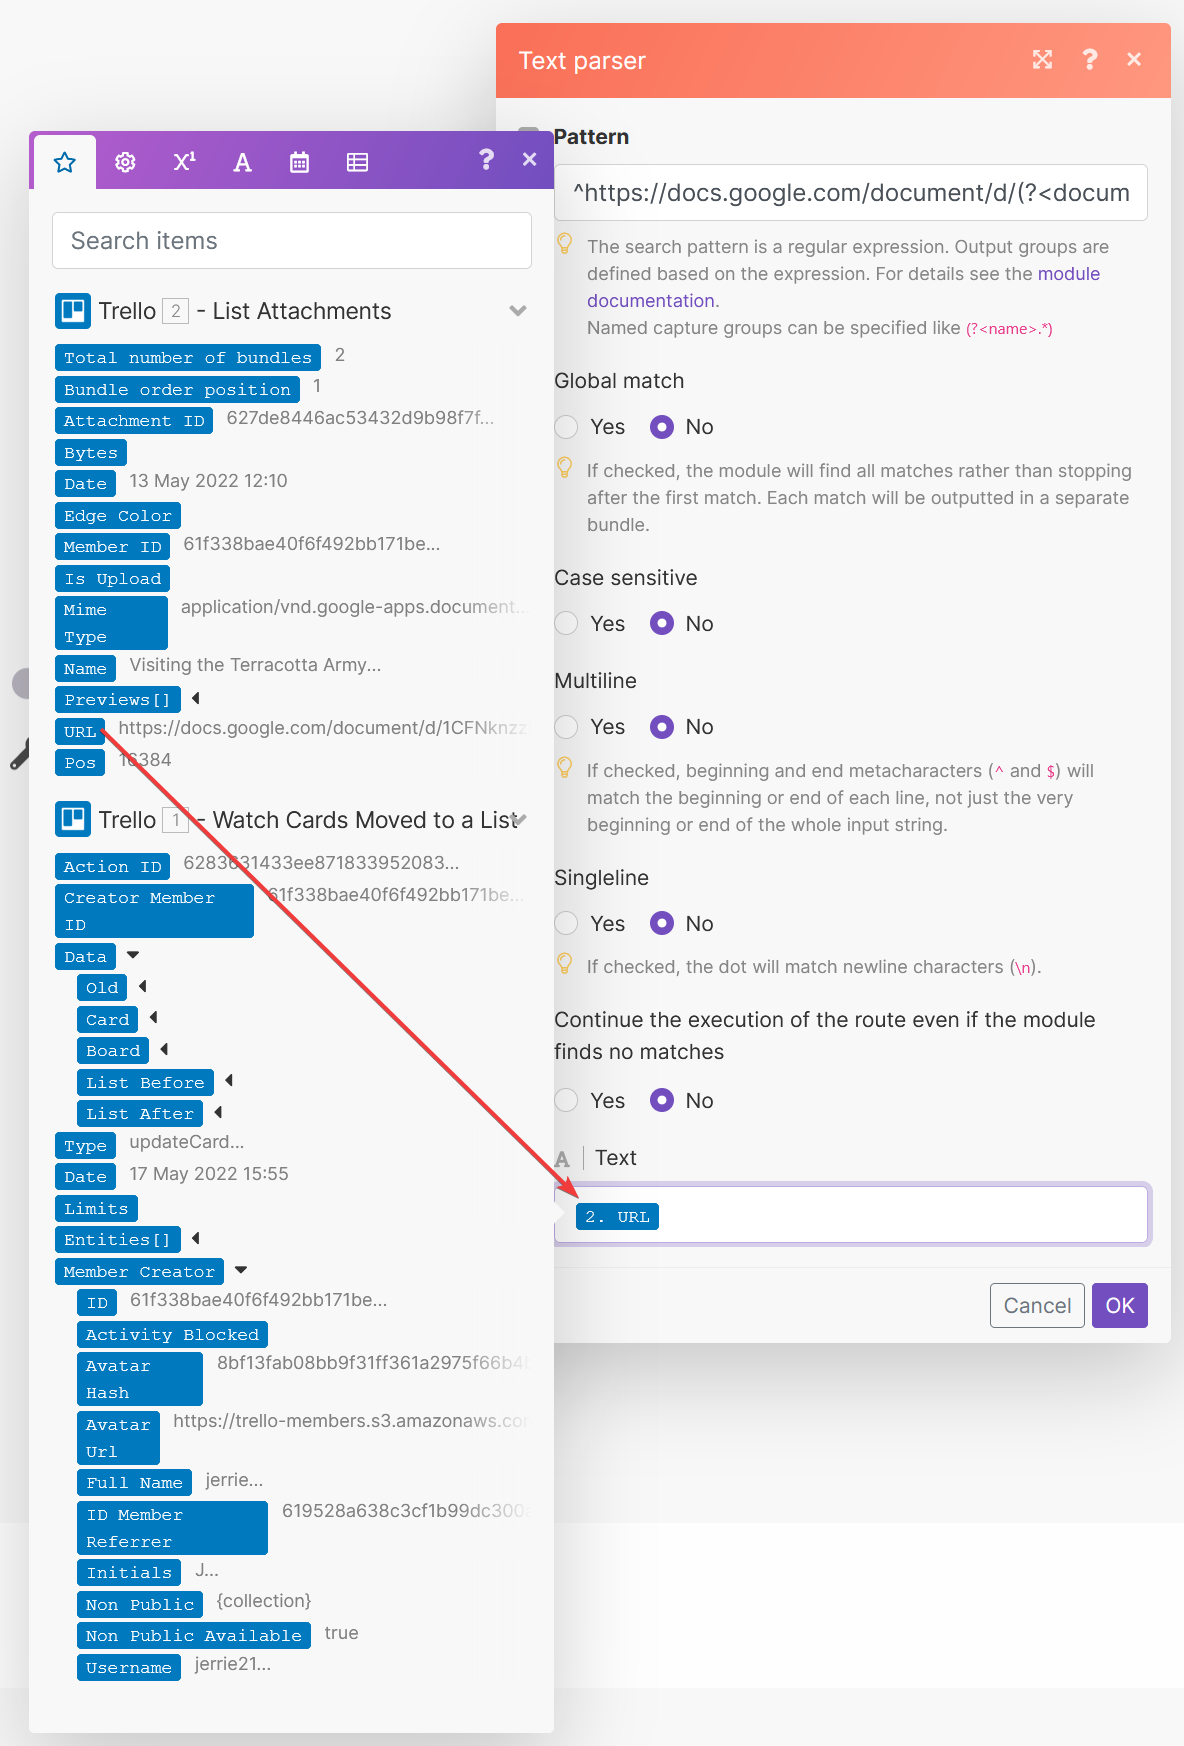
 This action will require a regular expression, and we can use the following expression:
 ^https://docs.google.com/document/d/(?<documentid>.*)/. This regular expression states that it will look for any string that starts with https://docs.google.com/document/d/, then contains any sequence of characters ((?<documentid>.*)) before encountering another forward-slash (/).
The sequence of characters we mentioned above is declared as a named captured group. The sequence of characters itself is just .*. We are surrounding it with a bunch of strange brackets, which turns it into what is referred to as a named capture group indicating that the Match pattern action should store the value of that part of the regular expression in a field called documentid.
So, to conclude, we can configure the “Match pattern” action using the regular expression ^https://docs.google.com/document/d/(?<documentid>.*)/ and the rest of the fields as per the screenshot below. Note that we use the URL output field from the previous step (”List Attachments”) as the Text field value.
 As confirmation, we can rerun the scenario and confirm that we have extracted the ID of the Google Doc correctly.
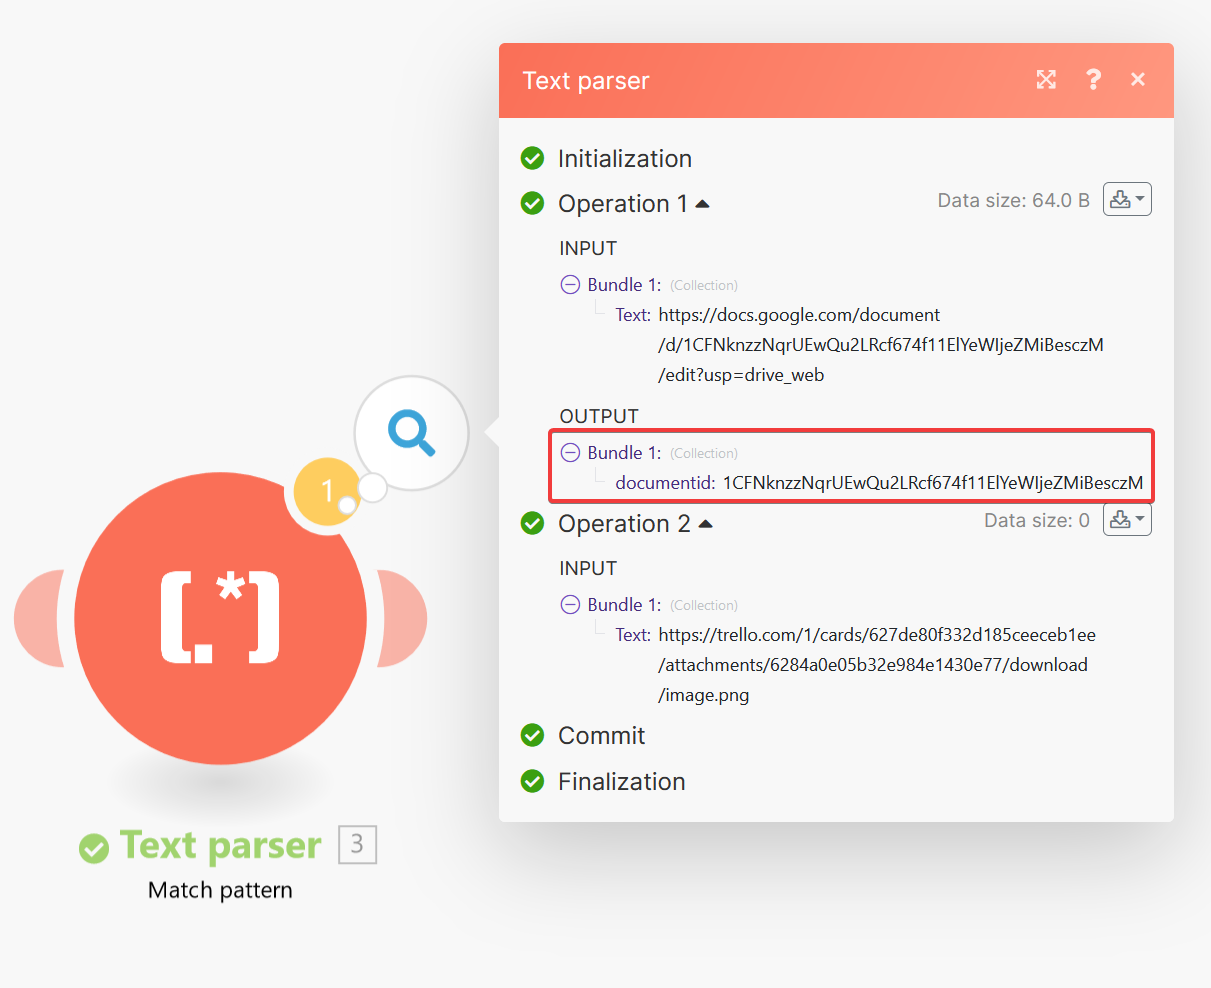 You will notice that the second attachment in the example above (the image) does not conform to the pattern of a Google Docs attachment defined by the regular expression and does not generate an output bundle. So, it is effectively ignored and will not be processed by the rest of the scenario.
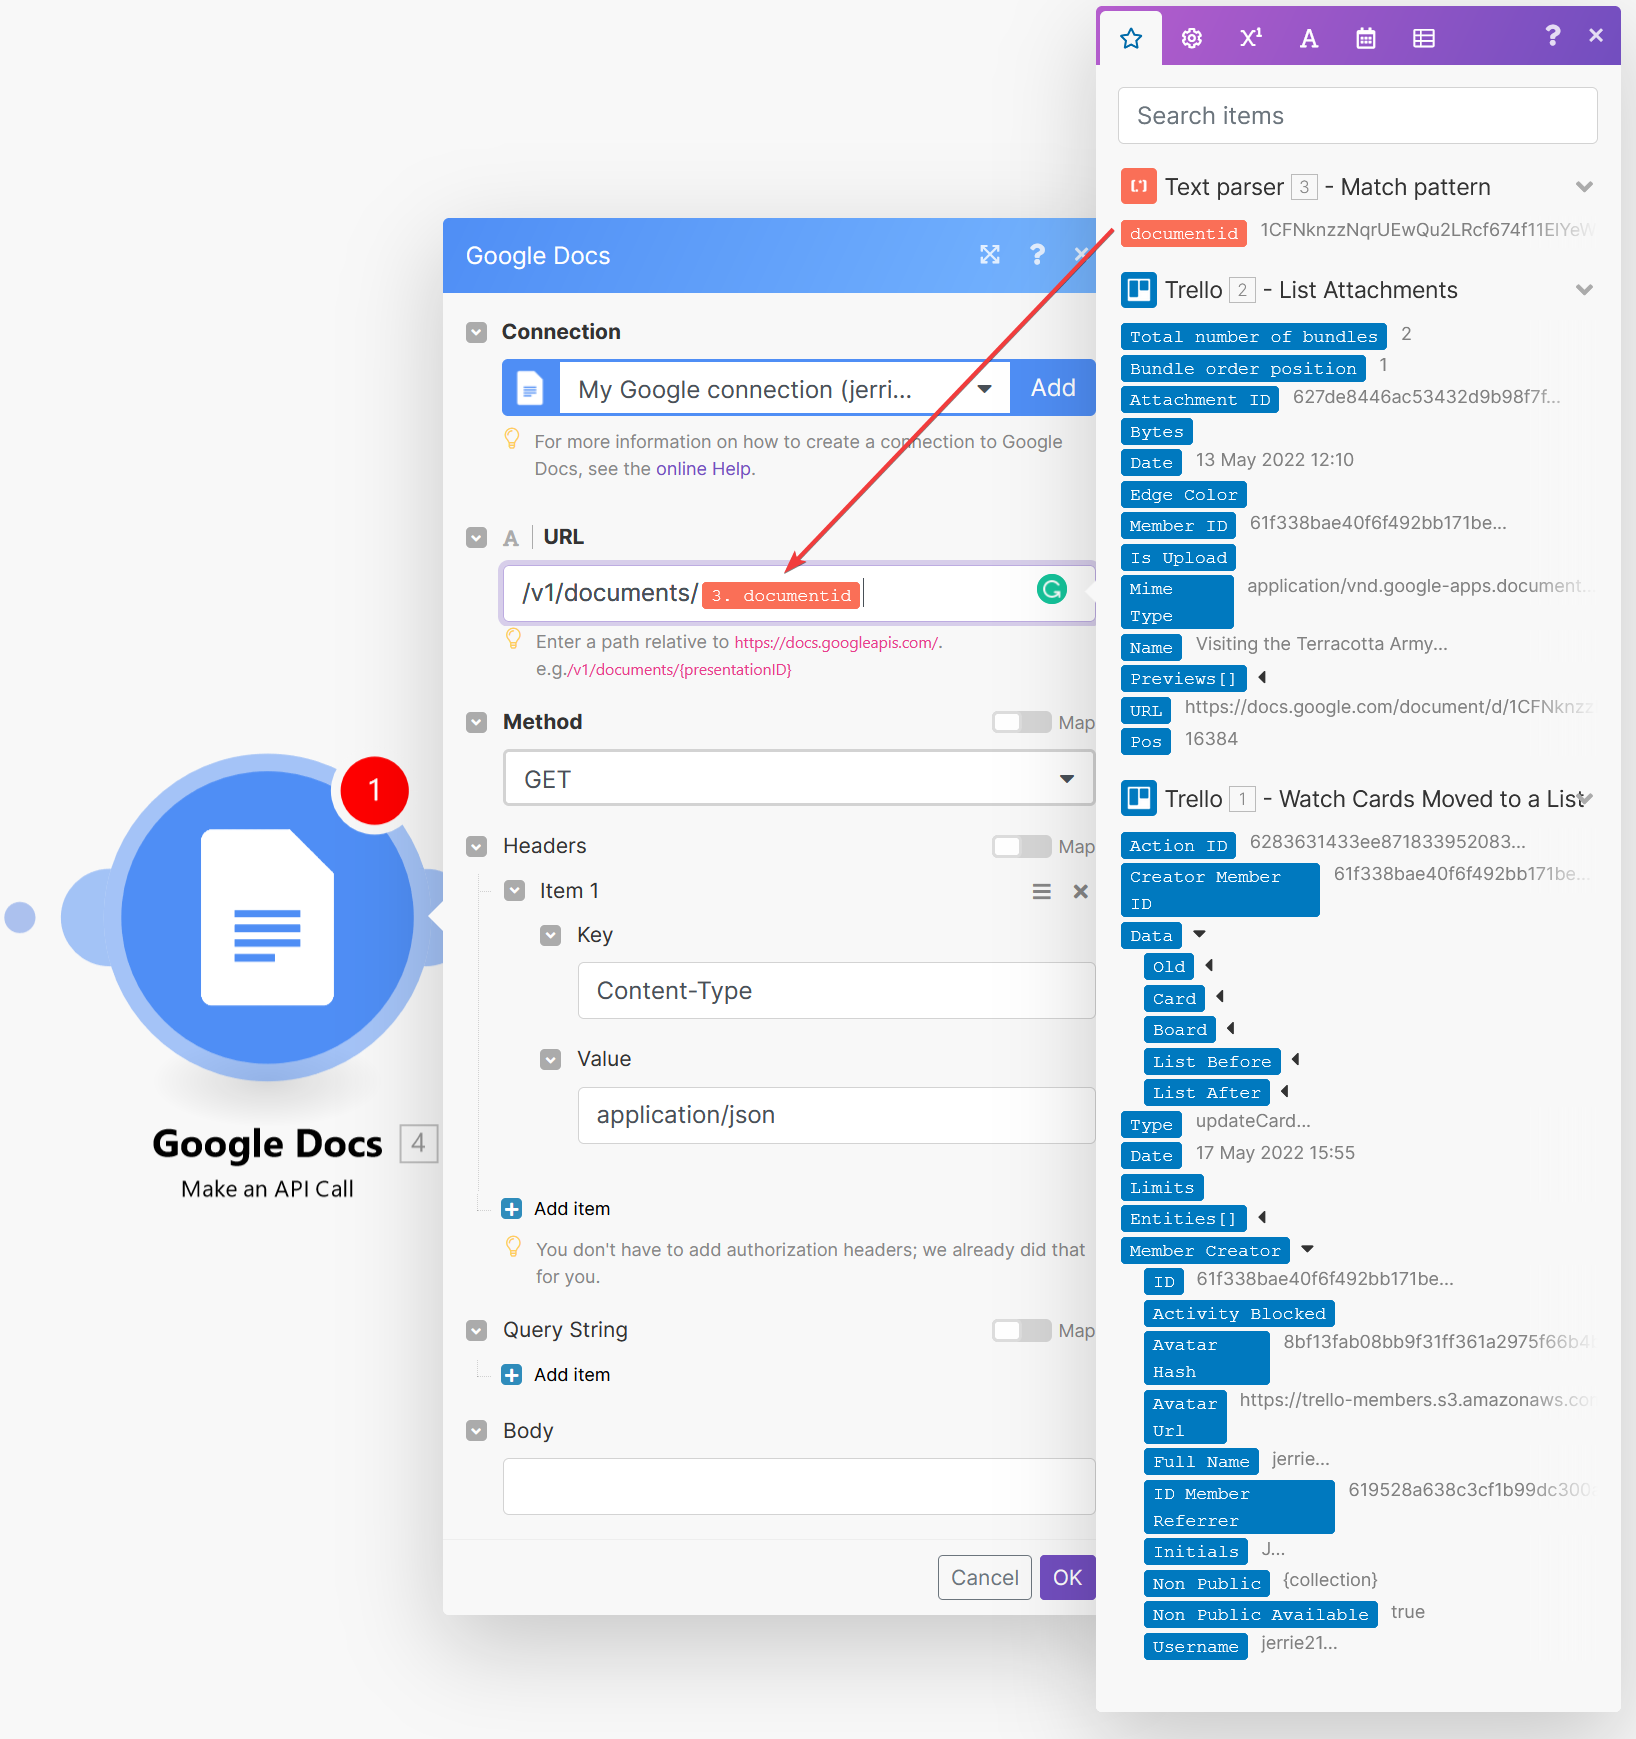
With the ID of the Google Doc extracted from the Trello card attachments, we can use that to download the document’s contents. The Google module contains an action for getting a document’s contents, but that will not work for our use case as we need the raw JSON format of the document.
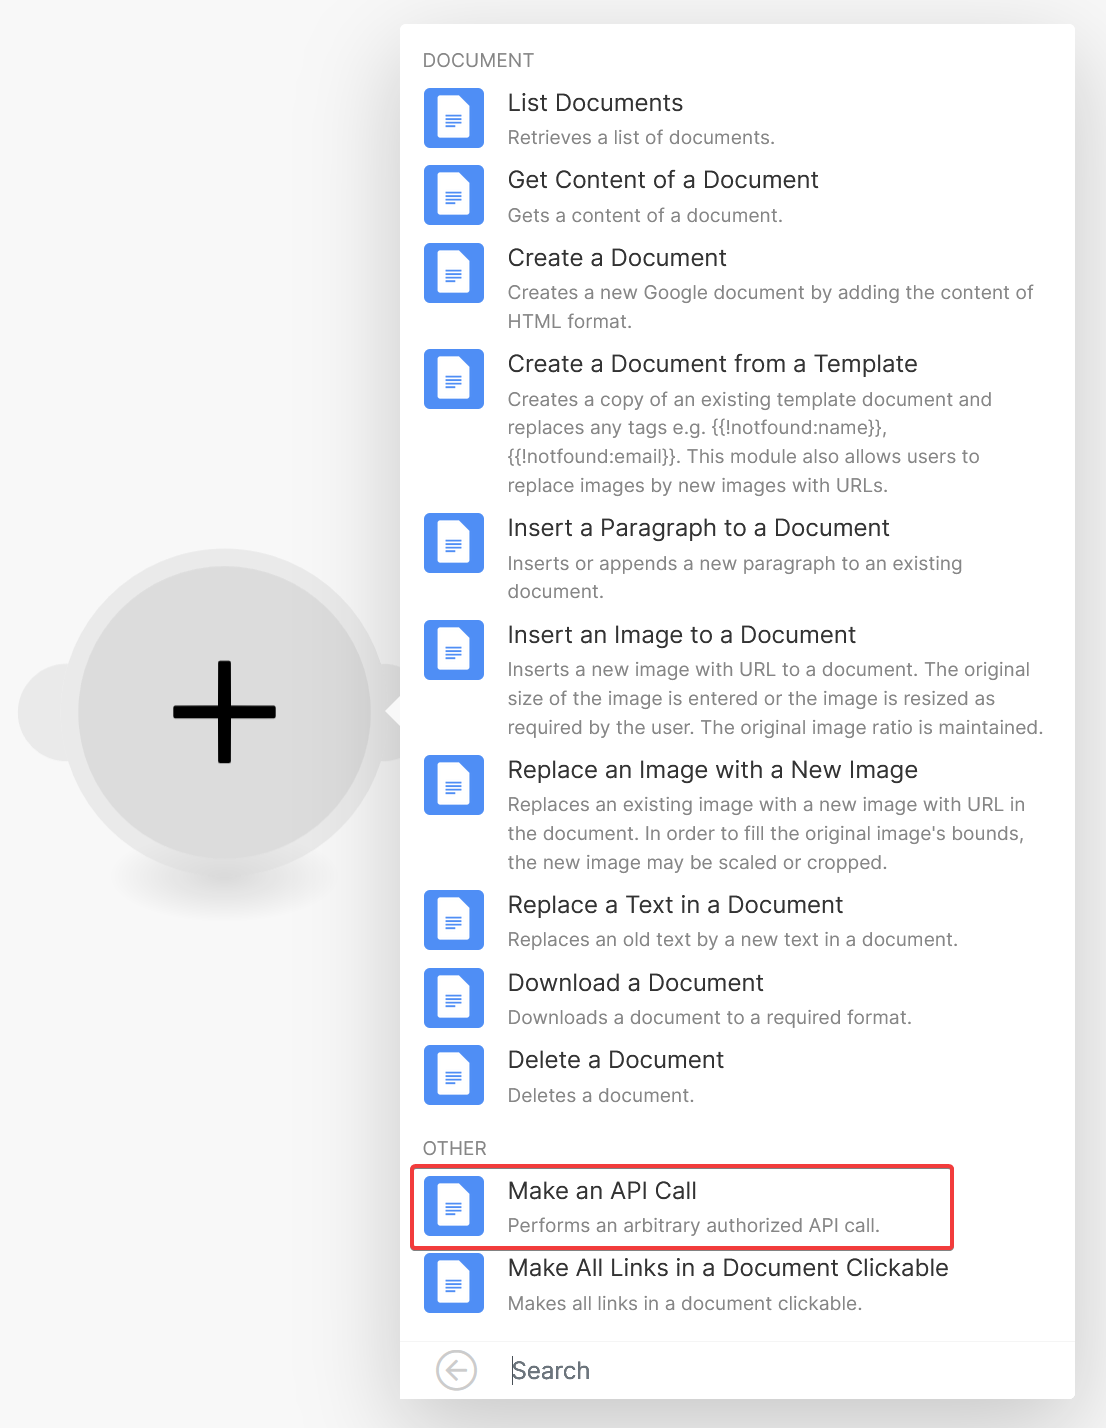
Instead, we need to make an API call to the Google Docs API ourselves. From the “Google Docs” module, add the “Make an API Call” action.
 Select the connection to your Google account. Specify the URL field as
 /v1/documents/ and use the documentid field value from the “Match pattern” action as the remainder of the URL, as seen in the screenshot below.
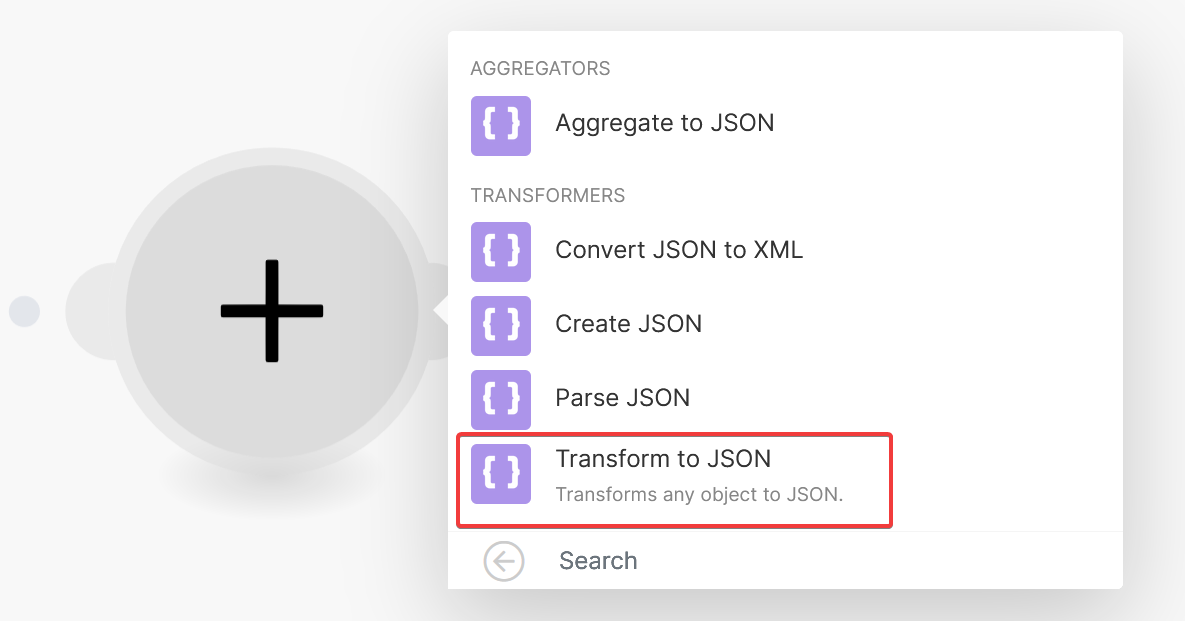
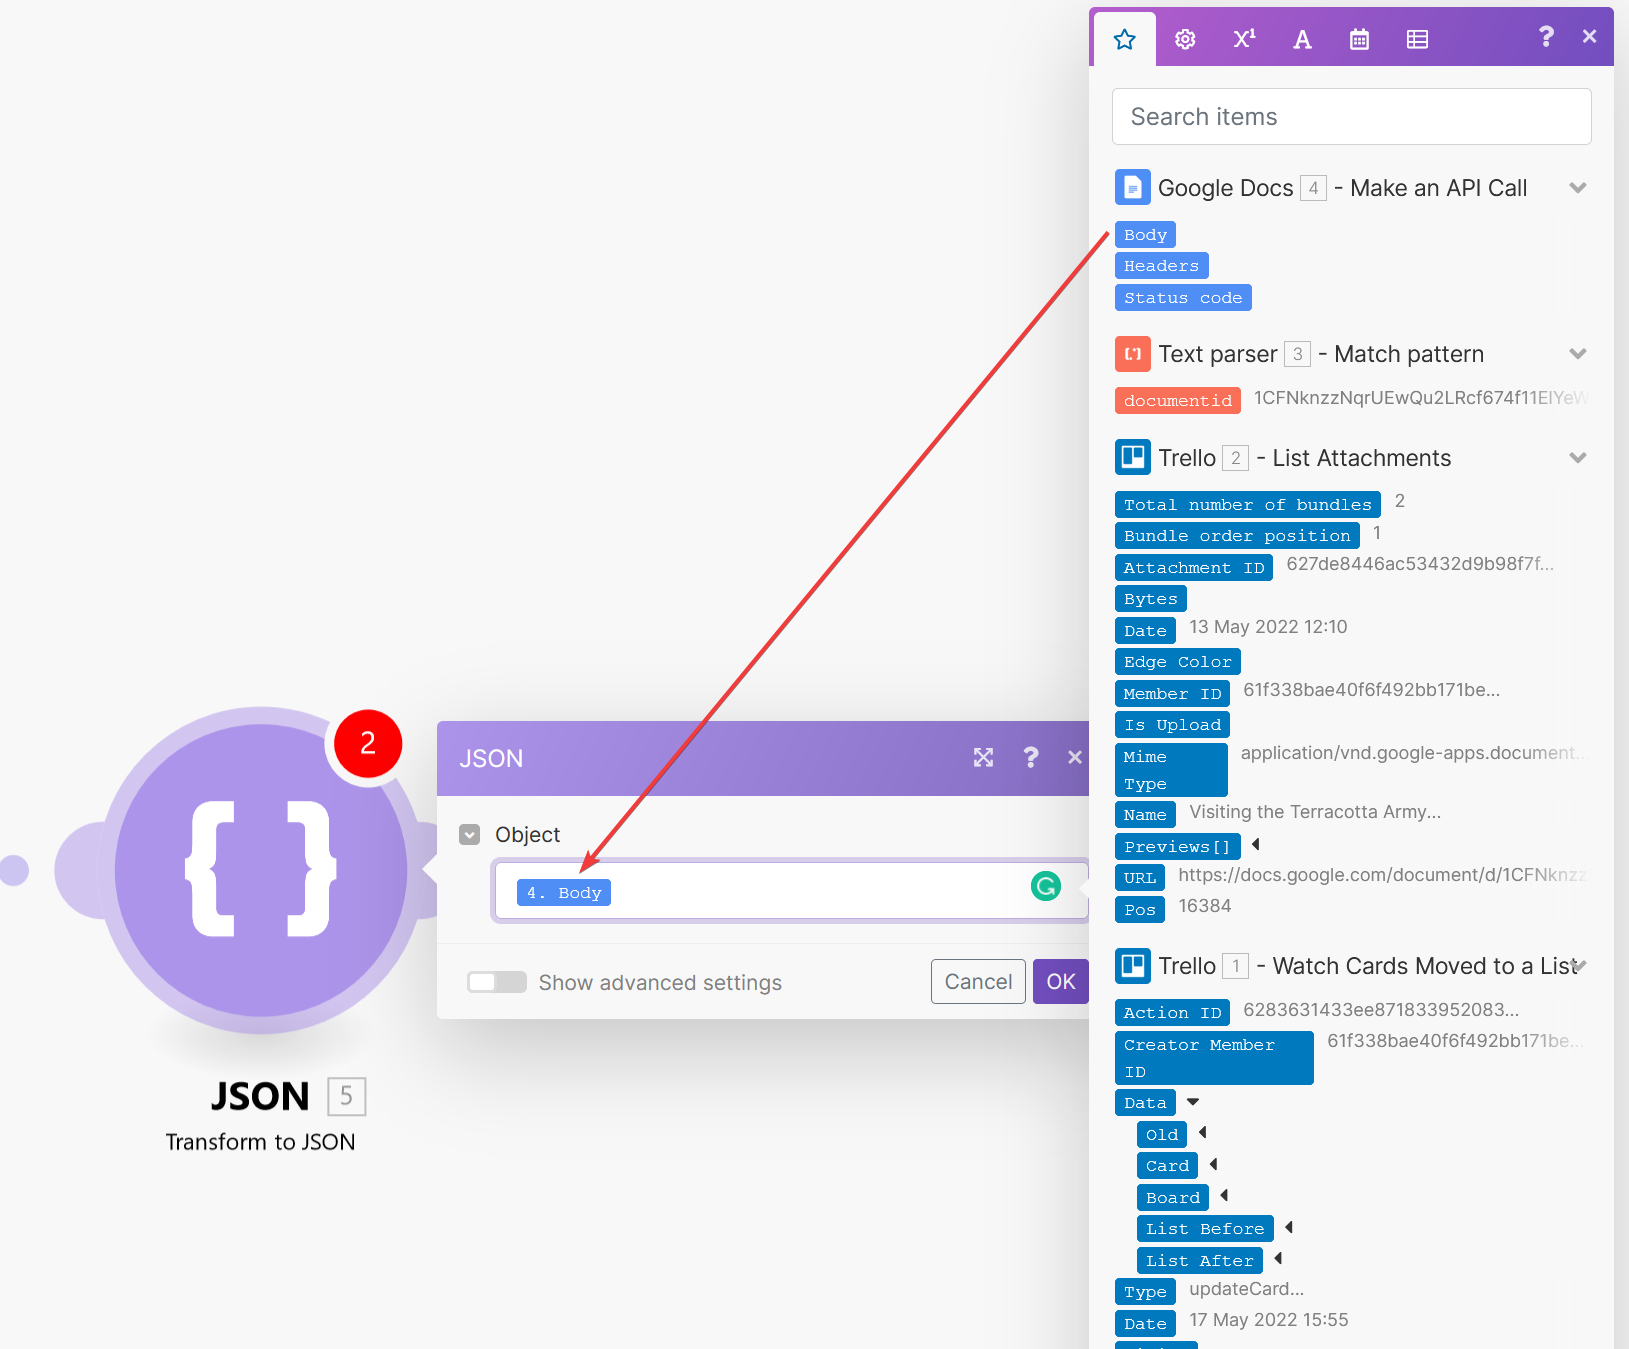
Even though the Google Docs API returns the JSON content of the document, Make still attempts to convert it to an object. We need to explicitly convert it into a JSON string before passing it to the Cloudpress API. Search for the JSON module and add the Transform to JSON action.
 For the Object property, select the Body output field from the previous step.
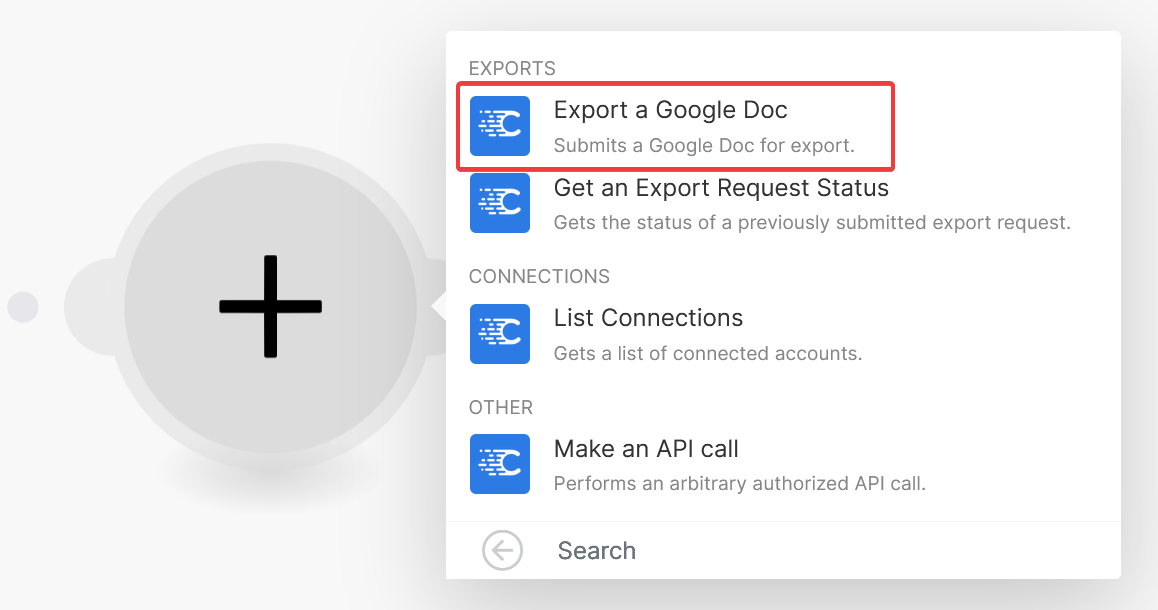
The next step in the scenario is to export the content to Contentful via Cloudpress. Add a new step to the scenario, search for the “Cloudpress” module, and then add the “Export a Google Doc” action.
 If you’ve never used Cloudpress in other Make scenarios before, you must add a Cloudpress connection. You will need the Personal Access Token for your Cloudpress account, which is available in the User Profile section of the Cloudpress dashboard.
Use the JSON string output field from the previous step as the value of the Content field. Select the Contentful account you have previously connected to in the Cloudpress Dashboard as the Destination Connection.

At this point, the scenario is complete, and we can test it out. Running the scenario again, you should see all the steps executing correctly.
 To track the progress of the export, you can go to the Export History page in the Cloudpress dashboard. Cloudpress usually starts exporting the content almost immediately and should finish the export within a few seconds - depending on the number of images in the document.
As you can see from the screenshot below, the export to Contentful was completed successfully.
 Switching over to Contentful, we can see the document contents were exported successfully, with all the formatting and images preserved.

If you are happy with the scenario, you can activate it by turning on the scheduling switch in the toolbar at the bottom of your scenario.
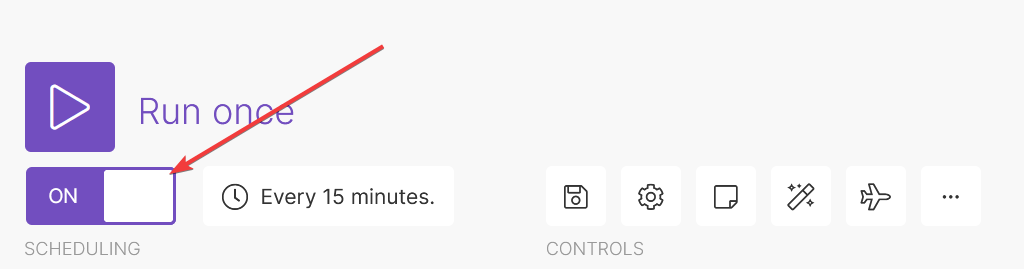 The scenario runs every 15 minutes by default, but you can change that by clicking on the schedule interval.
 This displays a dialog box where you can adjust the frequency. In the example below, I have configured the schedule for the scenario to run once a day a 1 AM.

This tutorial demonstrated how you could combine Google Docs, Contentful, Trello, Cloudpress, and Make to create an automated content publishing workflow. Automating this workflow can save you a lot of manual effort you would otherwise have had to perform to get the content from Google Docs into Contentful.
Manage your CMS content at scale.